

How To Install A Cupola On A Roof
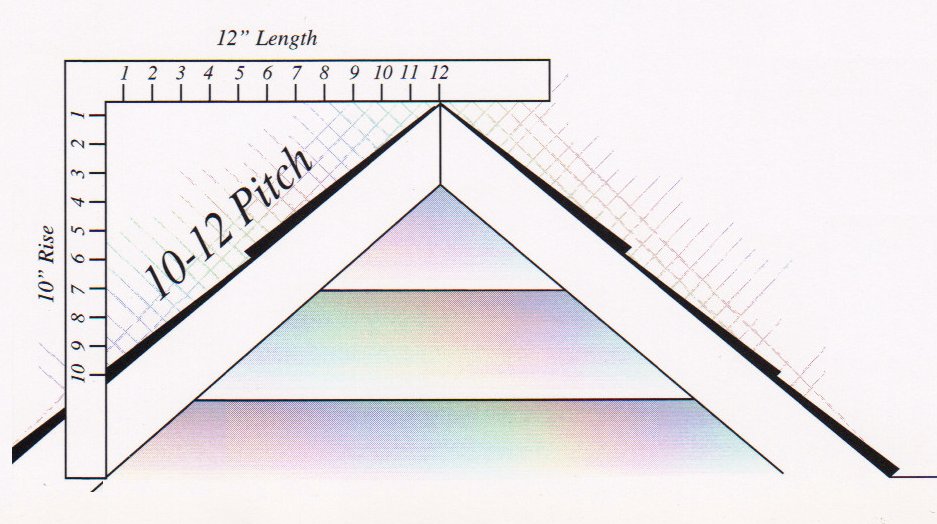
You will find copies of our cupola installation guide on this page. When purchasing one of our cupolas, you will too receive a re-create of our cupola installation guide when your cupola is delivered. If you are unsure of your roof pitch, you can use the roof pitch calculator diagram on this page. If you're notwithstanding uncertain of your roof pitch, experience free to contact i of our professionals.
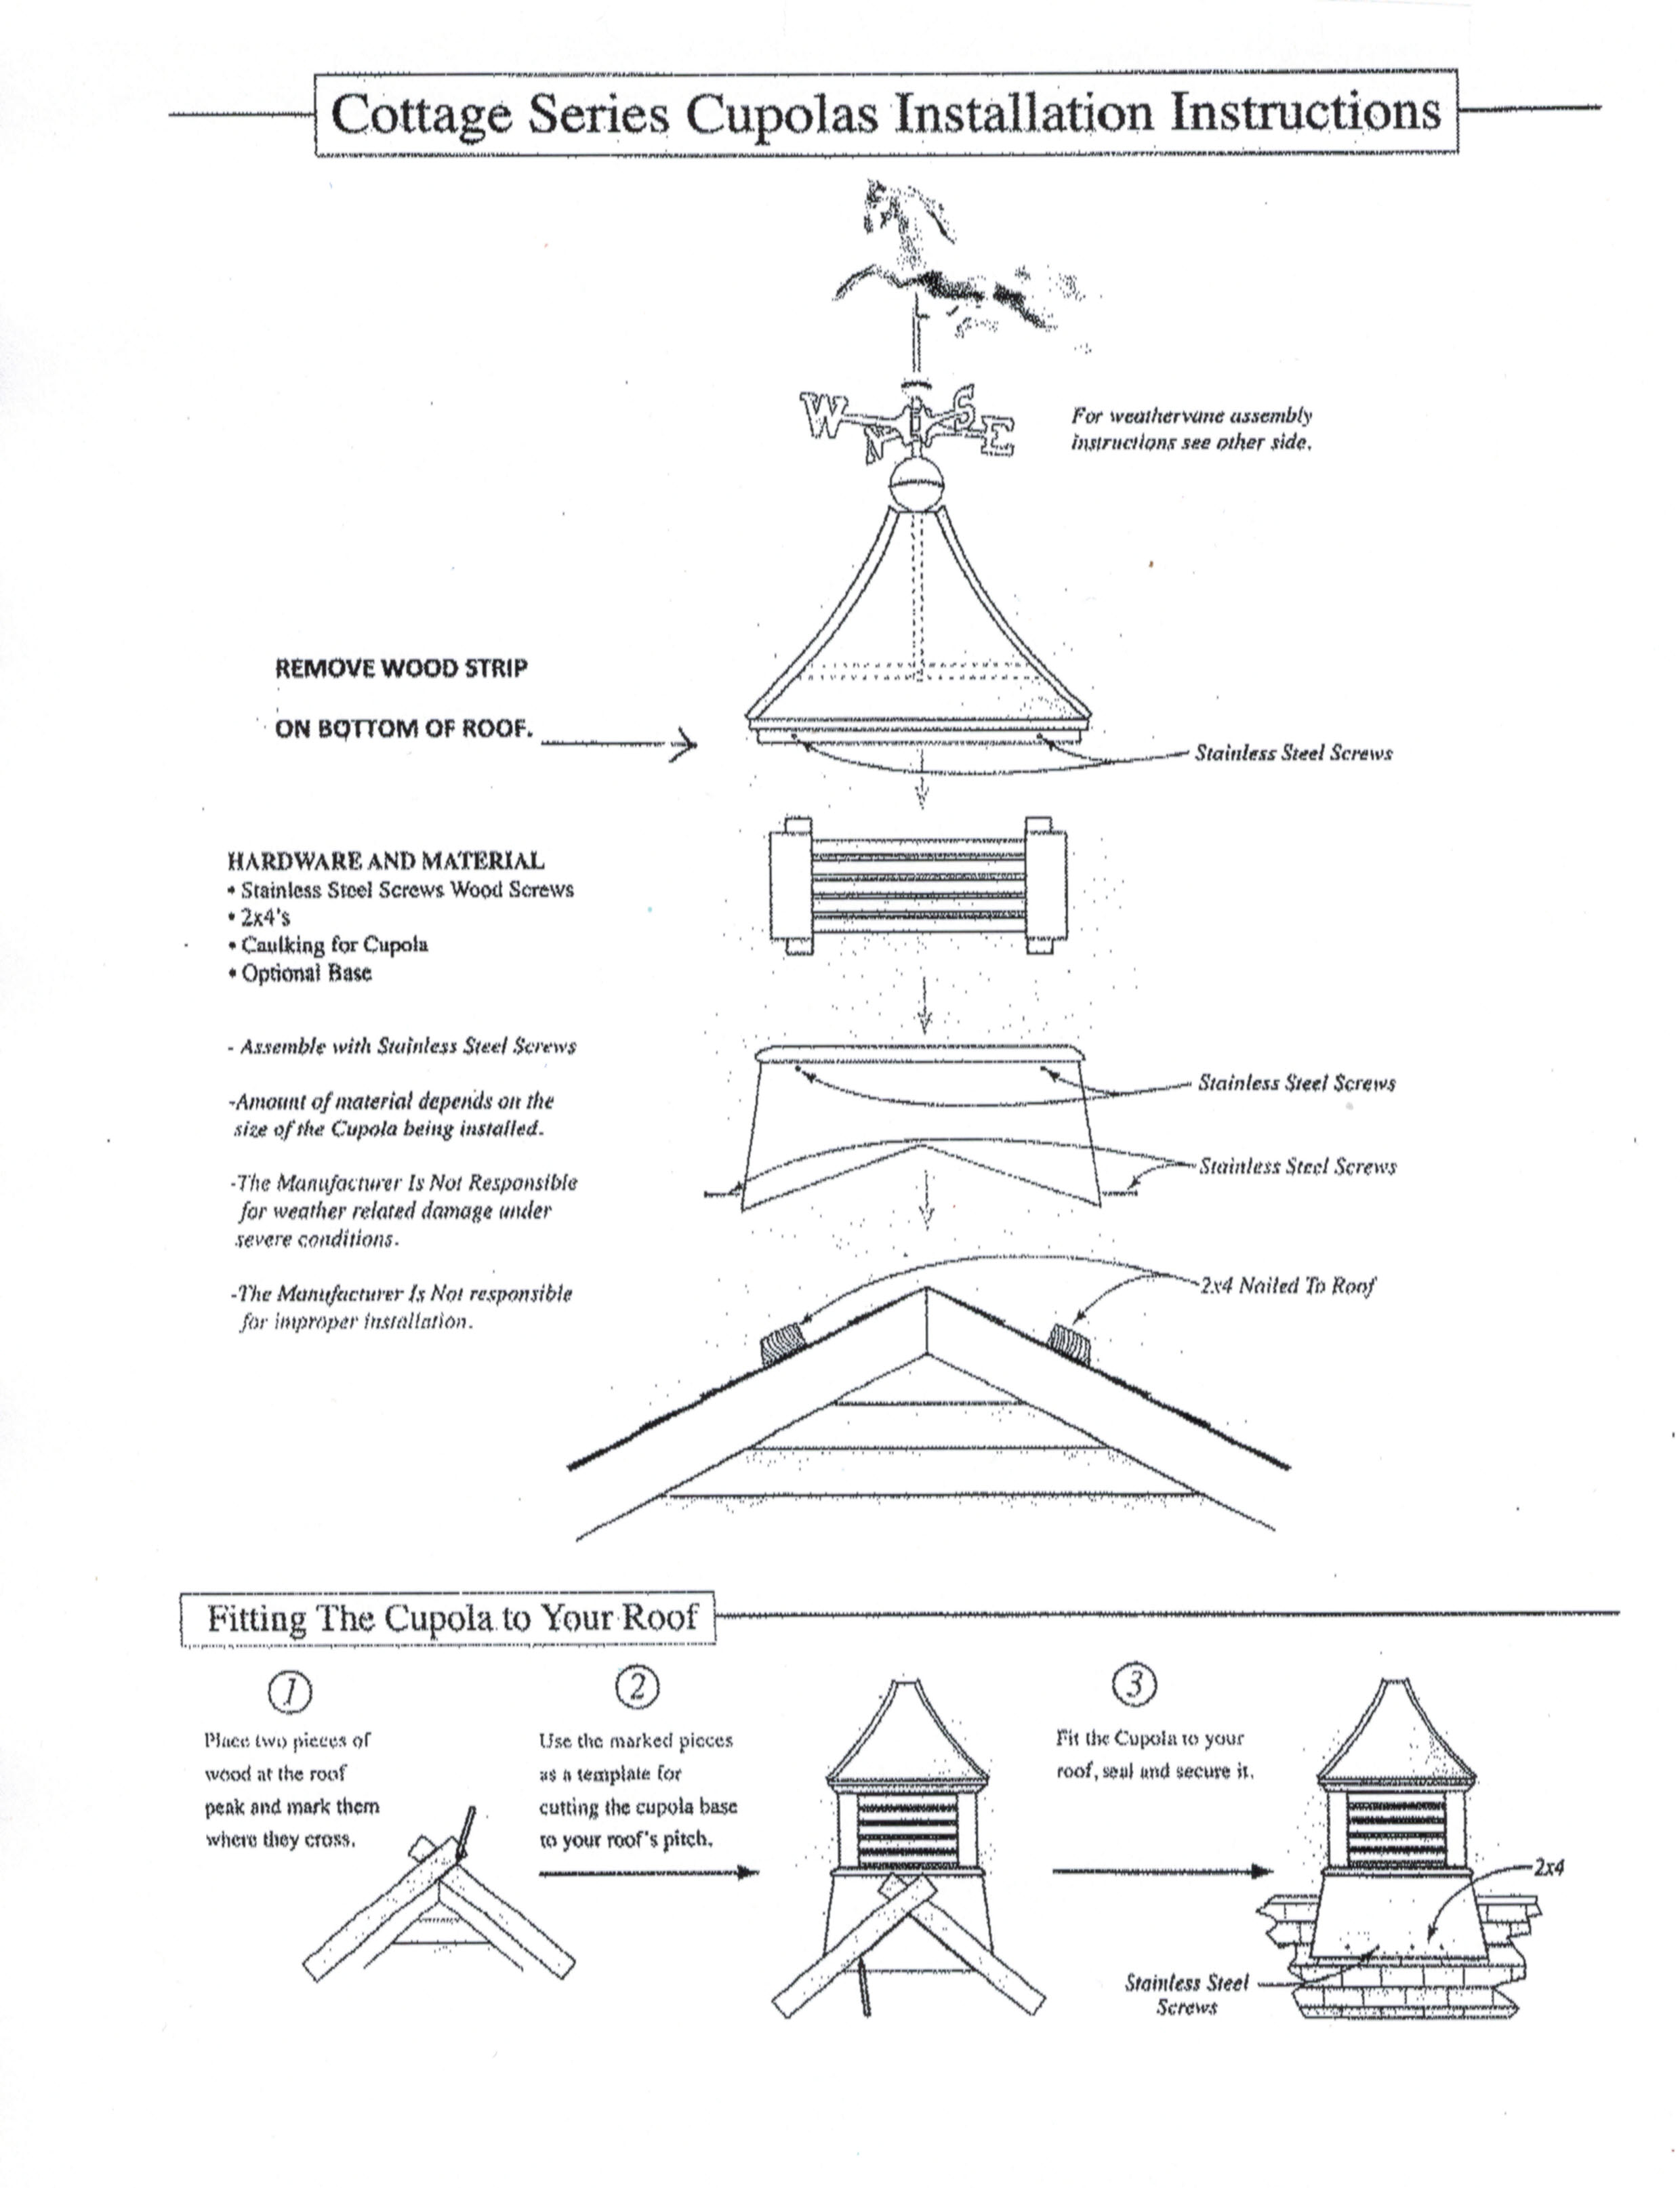
STANDARD CUPOLA INSTALLATION GUIDE:

Please read installation guide thoroughly before starting
1. Prepare Roof (Decorative - Recommended) - At that place is no preparation necessary to your roof if your cupola is to be installed for decoration only. (Recommended) If a ridge vent or cap is present, so cutout the cupola base of operations to fit over the ridge vent or cap. You tin also remove the ridge vent or ride cap where the cupola volition sit, and replace with cap shingles or flashing.
Set Roof (Ventilation or Accessibility) - If your cupola volition be used for ventilation or accessibility, cutting an opening in the roof, that is at to the lowest degree 12" smaller than the cupola base of operations or 5" - 6" smaller than the very within measurement of the cupola. The sill in a higher place the cupola base is typically the smallest within dimension. For example a threescore" cupola has an inside sill measurement of approx 49", and then the opening in the roof should be no bigger than 44". Brand certain that the main roofing fabric pertrudes into the cupola, up to the roof opening. (Boosted sealants must be used equally illustrated in pace #v) Remove roofing & sheathing but. Practice not cut ridge or rafters.
2. Determine Your Roof Pitch - Screw ii boards together and so they pivot. Straddle the roof with each board every bit shown, making certain each side is flat against the roof and the center is at the center of the peak. Mark the boards & apply another screw. This becomes your cutting template.
3. Mark the Cupola Base - Draw a centerline on the cupola base of operations as shown. Using your cut template, make a line from each corner to the centerline. This volition be your cutting line. Your base should at present exist set up to cut. Start cuts at corners and end at center.Annotation: For mounting on a metal roof y'all may need to cut your cupola base to fit down over the metal ribs or seams
4. Position - Position pieces of 2x4s on sides (shown) to exist snug against the within walls of the cupola base of operations. Screw them into the roof. Annotation: For cupolas 60" and larger it is recommended to install additional curbing - back up on the inside of the cupola base.
5. Mounting & Assembly - Adhere the base of operations to the 2x4s. In one case the base is secured to the roof, use silicone caulk to seal the sides of the base sections. Leave an area in the 2 lower edges unsealed to allow whatsoever water to drain. At present attach the mid-section to the base, and the top to the mid-section using the screws (provided) in the pre-drilled holes. Apply silicone caulk to all exposed spiral heads. Notation: When mounting for Ventilation or Accessibility y'all will want to apply roofing sealant & flashing to seal the sides of the cupola base to the roof. Exit an area in the 2 lower sides unsealed to let any h2o to bleed. Too utilise a dewdrop of caulk to the top edge of the cupola base of operations before attaching the mid-section.
OCTAGONAL CUPOLA INSTALLATION GUIDE:

Please read installation guide thoroughly before starting
1. Ready Roof (Decorative - Recommended) - There is no grooming necessary to your roof if your cupola is to be installed for decoration just. (Recommended) If a ridge vent or cap is nowadays, then cutout the cupola base to fit over the ridge vent or cap. You can also remove the ridge vent or ride cap where the cupola will sit, and replace with cap shingles or flashing.
Ready Roof (Ventilation or Accessibility) - If your cupola volition be used for ventilation or accessibility, cut an opening in the roof, that is at least 12" smaller than the cupola base or 5" - six" smaller than the very inside measurement of the cupola. The sill in a higher place the cupola base is typically the smallest within dimension. For example a 60" cupola has an inside sill measurement of approx 49", so the opening in the roof should be no bigger than 44". Make sure that the primary roofing material pertrudes into the cupola, upwards to the roof opening. (Additional sealants must be used as illustrated in footstep #5)Remove roofing & sheathing only. Exercise not cut ridge or rafters.
2. Determine Your Roof Pitch - Spiral two boards together and then they pivot. Straddle the roof with each lath as shown, making certain each side is flat confronting the roof and the center is at the center of the pinnacle. Mark the boards & utilize another spiral. This becomes your cut template. Cut a piece of cardboard the size of your cupola base. (Example: If your cupola measures 42" broad from flat side to flat side and is 17" high, the cardboard should be cutting 17" 10 42".)
iii. Marking the Cupola Base - Draw a centerline on the cardboard template. Using your cut template, brand a line from each corner to the centerline. This volition be your cutting line. Beginning cuts at corners and stop at middle. Afterwards marker and cutting the cardboard, line up the centerline with a middle marking on the two opposing sides of your cupola base and trace the cutout lines. Now connect these marks with the corners of the adjacent base of operations panels. Your base of operations should now be set up to cut.Note: For mounting on a metal roof y'all may need to cutting your cupola base of operations to fit down over the metal ribs or seams.
four. Position - Position pieces of 2x4s on sides (shown) to be snug against the within walls of the cupola base of operations. Screw them into the roof. Notation: For cupolas 60" and larger information technology is recommended to install additional curbing - support on the inside of the cupola base.
v. Mounting & Assembly - Attach the base of operations to the 2x4s. In one case the base is secured to the roof, utilise silicone caulk to seal the sides of the base of operations sections. Leave an surface area in the 2 lower edges unsealed to allow whatever h2o to drain. Now adhere the mid-department to the base, and the top to the mid-section using the screws (provided) in the pre-drilled holes. Use silicone caulk to all exposed screw heads. Note: When mounting for Ventilation or Accessibility you will want to utilise covering sealant & flashing to seal the sides of the cupola base to the roof. Go out an area in the 2 lower sides unsealed to let any h2o to bleed. Too utilize a dewdrop of caulk to the acme edge of the cupola base before attaching the mid-section.
METAL CUPOLA INSTALLATION GUIDE:

Delight read installation guide thoroughly before starting. If base has a gene cutout skip steps 1-3.
one. Prepare Roof (Decorative - Recommended) - There is no preparation necessary to your roof if your cupola is to exist installed for ornamentation only. (Recommended) If a ridge vent or cap is present, and then remove to fit over cupola flashing. Additional cap flashing may be installed over ridge on the inside of the cupola.
Prepare Roof (Ventilation or Accessibility) - If your cupola will be used for ventilation or accessibility, cut an opening in the roof, that is at least 12" smaller than the cupola base or 5" - half-dozen" smaller than the very inside measurement of the cupola. The sill in a higher place the cupola base is typically the smallest inside dimension. For example a sixty" cupola has an inside sill measurement of approx 49", so the opening in the roof should be no bigger than 44". Brand sure that the master roofing fabric pertrudes into the cupola, up to the roof opening. (Boosted sealants must be used equally illustrated in pace #5)Remove roofing & capsule just. Practise not cut ridge or rafters.
2. Determine Your Roof Pitch - Screw ii boards together so they pivot. Straddle the roof with each lath as shown, making sure each side is flat confronting the roof and the center is at the center of the height. Mark the boards & apply another screw. This becomes your cutting template.
three. Mark the Cupola Base of operations - Remove the screws holding the 2 opposite (metallic) side panels of your cupola base, keep these pieces to reattach to original position. Draw a centerline on the cupola base as shown. Using your cut template, make a line from each corner to the centerline. This volition be your cut line. Your base should now be set to cut. Start cuts at corners and end at eye. It is recommended to use a hand-held jig saw for making the cutout. Y'all volition also demand to match the cutout in the metal panels that were removed earlier.
4. Adhere Flashing & Side Panels- Bend the 2 flashing pieces in the center to the aforementioned angle as the cupola base cutout. Now hold the flashing in place with the 1" side against the cupola base. Mark & cutting the end of the 1" flange and fold over and insert on the bottom of the side panel with flashing. Attach flashing to wood base of operations with nails provided. It may be necessary to drill small airplane pilot holes for nails. At present reattach side panels to their original position. Insert actress screws in side panels where needed.
5. Attach Cupola Base of operations to Roof -It is recommended to install the cupola before any ridge cap or ridge vent is in place. If ridge caps have already been installed they volition take to be removed where cupola will be installed. If mounting on a metallic roof, utilise closure strips where the cupola flashing will be installed. Install cupola base on roof and adhere flashing to roof, with one" hex caput screws (provided). If installed on a metal (ribbed) roof insert a screw on every rib. Now attach the ridge cap over the cupola flashing. Notation: When mounting for Ventilation or Accessibility you will want to apply roofing sealant & flashing to seal the sides of the cupola base to the roof. Leave a small area in the 2 lower sides unsealed to allow any h2o to bleed. Too apply a bead of caulk to the top border of the cupola base before attaching the mid-section.
half dozen. Mounting & Assembly - For added support you lot may install boosted 2x4 blocks on the inside of the cupola base to the roof. After the cupola base has been installed, attach the mid-section to the base, and the elevation to the mid-section using the screws (provided) in the pre-drilled holes. Apply silicone caulk to all exposed screw heads. Annotation: For cupolas 60" and larger information technology is recommended to install additional curbing - back up on the inside of the cupola base.
COTTAGE CUPOLA INSTALLATION GUIDE:
Easy ROOF PITCH CALCULATION GUIDE:

Source: https://cupolasdirect.com/installation-guides
Posted by: hibblerackind.blogspot.com
0 Response to "How To Install A Cupola On A Roof"
Post a Comment